When your PhD starts to come to a close, you move to the last phase: the task of writing up everything you have accomplished into one digest. You can call it a dissertation or a thesis, but for those who have never seen one before, it pretty much resembles a small book — complete with an ISBN, acknowledgements, and a cover. The cover is unique because it allows the author to abandon scientific rigor for artistry, an opportunity to show some character. Real-time graphics is a passionate hobby of mine, so I decided to create it algorithmically. This post explains how I implemented it, and assumes the reader has a basic understanding of OpenGL in C++. Feel free to take a look at the public repository on GitHub.
Design goals
Even early-on in my research project, when thinking about what I would want my cover to look like, my mind immediately jumped to a tree. My research project had absolutely nothing to do with them, but given their high symbolic value (e.g. tree of wisdom), I thought it wasn’t inappropriate. They are also known to be difficult to create with a procedural algorithm, so I wanted to take on the challenge.
I also really liked the idea of creating a visual effect where the front and back cover were connected – as if you could look through the book. The subject of my PhD was on cavity optomechanics with rectangular cavities, so I thought the front should have a rectangular cavity, and the back a tree.
Procedural trees
Trees are often the focus of procedural generation – the wikipedia page on procedural generation actually has photos of trees as the prototypical example! I’d like to compare two different methods; the most commonly used is with L-systems, and another more modern algorithm is called space colonization. Hopefully I’ll be able to convince you why the latter method is the superior one.
L-systems
An L-system is a grammar, a method for creating a sequence of symbols using various concretly defined rules. These symbols can then be linked to geometrical commands, which generate a visual output. Usually these commands will be a variation of turtle graphics, e.g. move forward 10 pixels, turn 30 degrees, etc. The grammatical rules in often involve recursion, which is why it is such a strong method for creating objects which have a self-similar (fractal) nature, which many things in nature inherently posses. Think of a fern: a leaf of a fern looks suspiciously similar as a fern itself.
Trees, however, are not self-similar in a way that accurately maps to the semantics of an L-system. Just Google L-system trees and you’ll immediately notice how unrealistic they look. It’s too deterministic. To compensate for this, L-system rules are given a randomization factor for each recursive iteration, which partly solves the problem, but this causes the method to become incredibly unintuitive. You’re left struggling to find the right probability distribution for what visual result you want.
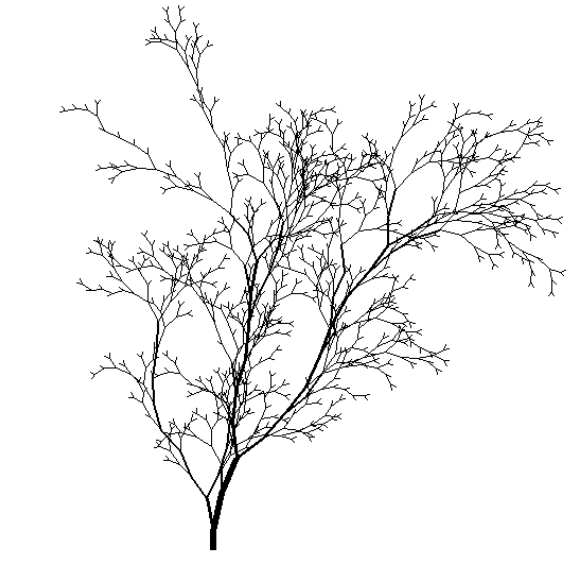
A typical example of what a non-deterministic L-system tree looks like.
Don’t get me wrong, L-systems are fascinating in their own right. They can be used to create the most easily recognizable fractals, like the Sierpinski triangle and Koch snowflake. A colleague once showed me his dissertation on how he created superconducting circuits with the topology of Penrose tiles, and we realized that the generation method of these tiles are a perfect example of an L-system.
Space colonization algorithm
This paper demonstrated a simple but remarkably clever way to approximate the actual physics of how organic things branch. It can be used not only for trees, but for things like neurons and veins.
Instead of having to supply an unintuitive ruleset as with L-systems, you supply a set of ‘attraction points’ towards which a tree will grow and one starting node for the root of the tree. Then, for each iteration, you follow these steps:
- For each active attraction point, identify the closest tree node. If this distance is within a certain radius of influence, then the attraction point is linked to that node.
- For each node, take the average direction of all linked attraction points, and emit a new node a certain unit length in that direction.
- For all new nodes, check if there are any attraction points within a certain kill radius, and if so, deactivate the attraction point.
A demonstration of the space colonization algorithm. The red dots are the attraction points which get gradually killed off.
The name space colonization is apt, because trees do compete for the available space determined by light intensity and previous branches. (L-systems have no simple method to limit overlapping branches.)
The parameter space has now been switched. The algorithm is controlled by three parameters: radius of attraction, unit length, and kill radius (Previously your parameters were grammatical rules.) Still, the tricky part is creating the distribution of attraction points, especially in how they relate to these previous parameters.
OpenGL walkthrough
The OpenGL environment is set up using GLFW3 as a windowing library with GLEW for extension functions. I also use GLM for mathematical operations and random distributions.
First step is calculating the tree nodes on the CPU using the space-colonization algorithm mentioned above. I had to experiment a lot with how to create the attraction point distribution. The most obvious requirement is that the space has to occupy the outer bounds of where you want your tree to grow. Controlling the density of points is tricky, however. Make the density too low, no nodes will grow in that direction; too high, and the branching will look too dense and bushy. I like it when trees have a nice vascularity, and this is achieved, in my experience, when the kill radius is very close to the radius of attraction.
I wrote a random distribution function which emits a point inside a circle, with an extra parameter which determines how much the circle’s center bulges out-of-plane. The parameters of this distribution start out emitting low-density points near the root, and then gradually increase in density, radius, and bulging of the random function. This is how the envelope is created.
The nodes of the tree are sent to the GPU and rendered as billboarded quads using instanced rendering (e.g. with glDrawArraysInstanced). My initial plan was to get creative with procedural textures for each tree node – each billboard had access to a few parameters that could be used by the fragment shader, but in the end I did not use any of it except color and size, and each billboard is just a circle with an anti-aliased modification of smoothstep:
void main() {
  out = color*(1.f - aastep(0.8f, length(uv)));
}
The tree is captured by a framebuffer object (FBO) and ran through a Gaussian blur stage to soften the edges a bit. The entire background of the tree is rendered in one full-frame pixel shader, where the FBO is manually blended into the picture. I used various contortions of gradient and value noise to create the sky, sun, clouds, stars and water reflection. This pretty much is the finished back cover that you can see on the left of Fig. 3.
An animation which shows the progression of various shader stages.
The backcover is captured again by an FBO and sent through a few successive Gaussian blur operations to create a high radius blur. The front page was a lot simpler to write, it is just a full-screen quad where an isometric projection of a rectangular cavity is made to be transparent, so that you can see the back cover.
A useful interface element I built into the project is that various parameters were emitted into an external json file which could be recalled by running the program with that file as a command line argument. All these parameters could be tweaked using clicking and dragging while the program was running. It would have been quite a nightmare to have to re-compile the project for each color-tweak! Things such as adjusting the camera angle and storing the seed for the random number generator were also emitted to this .json file. I used the fantastic one-file library json.hpp for this. Finally, by pressing p a unique PNG image was emitted with stb_image_write.h.
It was a lengthy but fun project, and gave me an appreciation for how low-level graphics applications are built, especially graphics engines used in the gaming industry. The irony is that I’m not much of a gamer – perhaps it’s time to start.